Right On Track

Healthy Personal Fitness

The History of Physical Therapy — How It Got Started and Where It Is Today

World War II brought about many horrible things: mass genocide, air raids, and nuclear bombs. But amidst all the carnage, a specific branch of medicine was taken advantage of that has changed the way humans have dealt with injury ever since.  With all the injured war veterans and increased on-the-job industrial accidents, doctors and nurses saw that something needed to be done with the American population so the majority of them weren’t disabled and out of jobs. Earlier, in 1921, a woman by the name of Mary McMillan formed an organization called the American Women’s Physical Therapeutic Association that was just the right organization to get the job done.  As the 1930’s concluded, the organization began admitting male members and the name was changed to the American Physiotherapy Association. In 1946, the name was changed again to what is now its current title, the American Physical Therapy Association. This name change came with an official office in New York and a full-time staff to run it.


Mary McMillan

Mary McMillan


After the war in the 1940’s, the polio epidemic of the 1950’s brought about a new demographic of patients. Rather than war veterans, people of all walks of life, particularly children, were contracting the virus. This new, greater demand for rehabilitation caused membership to skyrocket and the number of educational institutions to increase from 16 to 39 nationwide. With the demand for physical therapists increasing every year, an executive board and house of delegates were assigned to manage the APTA’s goals and objectives for training new members. By the 60’s, the number of physical therapy programs at universities had reached 52 and were at 111 as of 2007. In the short amount of time between 2007 and now, the number of physical therapy schools has risen again to 199. The APTA headquarters has since moved from its original location of New York and is now based in Alexandria, VA where it has 74,000 members nationwide.


Child with Polio

Child with Polio


According to the Bureau of Labor Statistics, the amount of employed physical therapists was 198,600 in 2010 with an expected rate of increase at a whopping 39%. Also in 2010, the median pay was found to be around $76,310 a year—that’s $36.69 an hour. With statistics like these, it’s no wonder physical therapy is becoming as popular as it is. As the baby boomer generation of the post-war era ages, the demand for therapists will only increase creating much-needed jobs in the economy. A master’s degree in physical therapy is usually acceptable for most positions but more and more companies are requiring a doctorate to practice. Of the 199 available institutions to earn your degree, the U.S. News and World Report deemed the University of Southern California the #1 Physical Therapy graduate school in the nation (they hold the #1 title for Occupational Therapy as well) and the University of Delaware and University of Pittsburgh #2 and #3, respectively, in 2012.


Large Baby Boomer Generation

Large Baby Boomer Generation


By 2020, physical therapy will become one of the more popular occupations and is expected to employ 276,000 people. It is constantly expanding in research, practice, and education and will soon be as common as your family practitioner. Before I conclude, I want to make clear that physical therapy is not only for rehabilitation but for prevention as well. In order to utilize this growing profession, you should be aware that it has many benefits and when used appropriately can help you build a leaner, stronger, and more flexible body to improve your quality of life. Don’t be afraid to try it out, you’ll be pleasantly surprised with your results.


Hamstring Strengthening and Balance Training

Hamstring Strengthening and Balance Training

5 Comments »

Job Shadow Project – Spotlight on Dr. Catherine Hagan Vargo

As I have mentioned in the “About the Author” section of my blog, the reason I started Right on Track is because of a writing class at Pitt. We were recently given an assignment called the job shadow project. This project involved reaching out to a professional in our field of interest and shadowing them at their place of work. An interview and 5 page write-up were required. If appropriate, we could include a blog post about our person of interest to help characterize our profession the way we see it. So, you guessed it, this is a post about my person of interest, Dr. Catherine Hagan Vargo.


catherine vargo


Who She Is

Dr. Vargo, whose patients call her Catherine, is a physical therapist who works at Centers for Rehab Services in Pittsburgh, PA. CRS is an outpatient physical therapy clinic associated with the University of Pittsburgh Medical Center (UPMC) and has more than fifty different locations in western Pennsylvania. The one where Catherine works is located in the heart of Oakland in the Kaufmann Medical Building. She works with her fellow PTs (physical therapists), interns, and PT technicians to provide the best preventive and rehabilitative services to her patients that she can.

Aside from working at CRS, Catherine also works closely with the Pittsburgh Ballet Theatre. She can be found backstage or in the house (audience) a couple of days out of the week when she’s not at CRS. She acts as on on-site PT to the dancers providing immediate and convenient care to their injuries. According to Catherine, “they may hurt themselves crossing the street before a big show” or “come down wrong” from a routine during practice. It’s her duty to make sure they are still able to perform as the show must go on!

When asked why she took on the responsibility of rehabilitating dancers, Catherine said she, “always loved the arts” and “knew [she] would never be a professional dancer”. This is how she “can stay involved”. Upon further digging, I found out that she was a dancer herself at a young age until a brutal car accident at the age of 16 caused Catherine to need physical therapy as a patient. Once she entered the world of physical rehab, she never looked back.

After that fateful moment in time, Catherine decided that she wanted to go to Duquesne University for her studies. She got a dual Master’s degree in biology and health sciences and continued on to get her doctorate in physical therapy there also. She continues to make education a part of her life by teaching anatomy and physiology there as well.

Catherine is about as outgoing as you can get and takes pleasure in helping others. By spending ten minutes with her you can tell she’s passionate and knowledgeable about rehabilitating her patients and has a great sense of humor. The way she keeps the atmosphere around her so upbeat, you would have no idea that she starts the majority of her days at 5am and is on her feet for several hours after that documenting treatments and helping patients.


How We Met

In September of 2012, I was introduced to Catherine when I came into CRS as a patient after falling down a hill and suffering knee injuries. Since that time I have interacted with her on several different occasions including this job shadow project and when she was a guest speaker for my rehabilitation science student association.

Catherine has acted as an inspiration to me during the long hours of coursework that is college. I still have 5 years to go before I get my DPT and she has helped me to see the light at the end of the tunnel. I really appreciate that I got the opportunity to work with her both as a patient and as somewhat of an intern and enjoyed doing my project on her. If any of you are in the Pittsburgh area and are in need of PT, this is the woman to go to! Hopefully, when I’m in her position, I can say that I’m as wise and encouraging to my patients as she is to hers.


If you are interested in more information about Dr. Vargo, physical therapy, or my 5 page write-up, contact me at mjw104@pitt.edu.


Dr. Catherine Hagan Vargo

hagancc@upmc.edu

CRS: phone – (412) 692-4305


2 Comments »

Strep Throat Is Deadlier Than You Think

For this week I wanted to blog about something slightly different than what I usually write about. Unfortunately, I’m very prone to infections and other illnesses and tend to be in the doctor’s office at least once a month if not more (usually every other week). This post is not intended to help you diagnose anything or act as a substitute for a medical professional; I am merely sharing my story to get information out there.

This month I went to the doctor as a preventative measure to make sure I was clear of anything before going on spring break so I wouldn’t have to frequent Mexican hospitals while trying to relax on the beach. I went not expecting to be diagnosed with anything but did mention that a friend in my dorm had tested positive for the streptococcus virus (strep throat) earlier that day. As per routine, they did a rapid strep test and waited for the results.

I also mentioned that there was a bump on my right knee that I was a little concerned about (sometimes I can be a little bit of a hypochondriac since I’m always getting sick and tend to worry about the smallest things). I told them I got a bruise on that knee in that same spot from playing soccer a couple weeks ago but wasn’t sure if that was related. It was red, painful, hot, and protruding—acting like an infection—but I wasn’t sure what it could be since I couldn’t recall there being a break in the skin. They poked and prodded it a little and then drew a dashed line around the red and painful parts as a marker. I was told that if it gets any worse by this time tomorrow that I need to go to the hospital. Oh, and the rapid strep test was positive, go figure.

So I left the doctor with a diagnosis of strep throat and a suspicious looking bump on my knee. The next morning I hobbled down the hill to the emergency room (my campus is basically one big hospital) with an even larger bump, almost twice the size of the previously marked area. I told them about the soccer bruise and that the place I played has been known to give people methicillin-resistant staphylococcus aureus (MRSA). I was in and out of there in under an hour with another diagnosis of cellulitis (infection of the skin) due to MRSA. The picture below is my knee after the hospital, the cellulitis is on the right.


Cellulitis in right knee


Here I was, two days before my flight to Mexico, and I had strep and MRSA. Joy. I was hoping the antibiotics given to me would cure it in that time so I could go on break but boy, was I wrong. The next day I went back to the doctor for a follow up with an orthopedist and he suggested a joint tap to make sure my knee wasn’t septic. After some debate it was decided that I get it done at the hospital to get the fastest results. At the ER, they did a sonogram to find where the biggest pocket of fluid in my knee was but were having trouble. Eventually they found a small spot, no bigger than your pinkie nail, to draw from. The way my luck goes, they couldn’t pull any fluid out no matter how hard they pulled on the syringe. This was good news at first—I didn’t have a septic knee. However, this meant they wanted to keep me overnight for observation since they didn’t have any definitive quantitative results.

They told me I would get out in less than 24 hours and that this was just to make sure my knee joint was fine. They started me on IV antibiotics and checked in with me the next day. My infection wasn’t getting any better and I was starting to develop bruises on my lower legs. This continued on for four more days and a whole medical team of nurses and specialist doctors were rushing around trying to find out what was wrong with me. Below is what the bruises looked like when they started developing, before it got as bad as it did.


real en


It turns out that the bruises that appeared on my shins were the beginning stages of a “circulating immune complex–mediated process” (2) called Erythema nodosum. Painful welts develop on the lower legs, forearms, and face as a response, in my case, to elevated levels of the streptococcus virus. They speculated that this was what I had but needed to do a biopsy of one of the nodules just to make sure. The results came back as expected and I was put on a regimen of NSAIDs (non-steroidal anti-inflammatory drug, like ibuprofen) to reduce the pain and swelling. Below are my legs at day 3 of the hospital visit. The biopsy was done on the left knee and the cellulitis is on the right.


They also discovered that the cellulitis was not from MRSA, but from the strep infection as well. This phenomenon is called a colonizer and is not uncommon. Luckily, the virus went from my throat to my bloodstream and decided to settle again in my knee. Otherwise it could have settled in any of my vital organs and become life threatening. This was treated with IV antibiotics while I was in the hospital and oral antibiotics when I was released.

After 18 needle holes in my arms and knees, stitches, and an outrageous amount of antibiotics, I was released from the hospital and sent home. Luckily, my school was on break so I could recover without missing too many classes but it has still taken me about two weeks to get back to walking without pain. I’m still recovering slowly, but should be back in action by next week.

I wanted to blog about this so that people would be aware that this is possible and could happen to you. I had never contracted strep throat until this past October and have had it 5 times since and I certainly have never heard of getting strep in your knee. Please be mindful when it comes to your health and don’t hesitate to talk to your doctor if you think something is awry. It could save your life.


References:

1. Hann, Glenn. “Erythema Nodosum.” The Internet Journal of Advanced Nursing
Practice
23 Sept. 2008. General OneFile. Web. 21 Mar. 2013

2. Juan Mana, Joaquim Marcoval, Erythema nodosum, Clinics in Dermatology, Volume 25, Issue 3, May–June 2007, Pages 288-294, ISSN 0738-081X, 10.1016/j.clindermatol.2007.03.006.

3. Rowland, Belinda. “Cellulitis.” The Gale Encyclopedia of Medicine. Ed. Laurie J. Fundukian. 4th ed. Vol. 2. Detroit: Gale, 2011. 888-890. Gale Virtual Reference Library. Web. 21 Mar. 2013.

3 Comments »

Ankle Taping 101

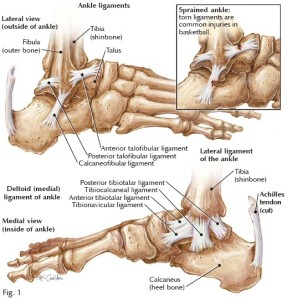
One of the most common injuries suffered by athletes is the ankle sprain. These are obtained through landing incorrectly after being airborne, planting your foot incorrectly, or even someone falling on you. Each sprain can be labeled as either high ankle, eversion, or inversion. A high ankle sprain involves the ligament connecting the two bones of our lower leg, the tibia and fibula, and is aptly called the anterior tibiofibular ligament (ATFL). An eversion sprain involves the deltoid ligament. This is a double-layered ligament that is on the medial aspect of the foot and is comprised of 4 individual ligaments: tibiocalcaneal (TCL), tibionavicular (TNL), anterior tibiotalar (ATTL), and posterior tibiotalar (PTTL). An inversion sprain involves the 3 ligaments of the lateral aspect of the foot: calcaneofibular (CFL), anterior talofibular (ATFL), and posterior talofibular (PTFL). While the names of these look sort of scary, they’re very easy to remember and locate. Ligaments are named based on their location and contain the roots of the bones they connect. For instance, the calcaneofibular ligament is attached to the calcaneus (heel bone) and the fibia (lateral leg bone). Out of the three types, an inversion sprain is the most commonly seen. Because there are only 3 ligaments on the lateral side, it is much less stronger than the medial which contains a double-layered 4 part ligament. It is for this reason that the ankle is more likely to roll inward than outward during activity.

ankle ligaments

Each sprain is further separated into grades of severity. The first grade involves stretching of the ligament and is accompanied by some mild pain and swelling. The second is a partial tear in the ligament that causes bruising and swelling and moderate to severe pain. The third and final grade involves a complete tear of the ligament and is usually seen with instability and a great deal of bruising, swelling, and pain.

In order to prevent this from happening, many athletes ask to have their ankles taped. While the tape job is not a hundred percent effective at preventing a sprain, it helps to reduce the risk of hyper-movement in the joints thus helping to prevent overstretching or tearing of the ligaments, provide some support and stability, and is a very effective tool when it comes to the “mind over matter” mentality so often used in sports.

What You Need:

1.5 inch Athletic Tape

HOW TO_athletic tape

Pre-wrap*

HOW TO_prewrap

Adhesive Spray*

HOW TO_adhesive spray

Heel and Lace Pads**

HOW TO_heel and lace

How To:

1. Begin by positioning the injured person’s foot at subtalar neutral (90° dorsiflexion).

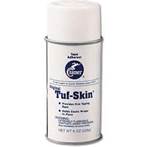
2. If you are dealing with sensitive skin or someone with hair on their legs, it’s a good idea to use pre-wrap* before applying tape. If this is the case, spraying the foot and lower leg with an adhesive spray* will help to keep it in place. Start at the base of the calf—where the muscle meets the tendons—and wrap around and down the leg to the 5th metatarsal on the foot making sure there are no gaps. Leaving holes in the pre-wrap could lead to discomfort and blistering.

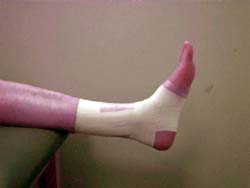
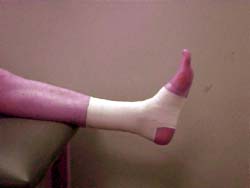
3. Your first pieces of tape are called anchor strips. There will be three total and two of them should be placed on the shin at a downward angle over the pre-wrap. The third will be at the base of the 5th metatarsal. In order to secure it to the leg, make sure half the width of the piece of tape is put directly onto the skin. These provide a platform to begin working from for the rest of the taping.

HOW TO_anchor strips

4. After your anchor strips are in place, three stirrups will go over the bottom of the heel. Each stirrup will be secured by a base strip that is almost identical to the anchor strips. Start by placing your tape on the lateral side of the ankle and pulling it over the malleolus (ankle bone) to the medial side. Lay a base strip over that, underneath the second anchor strip at the base of the calf. Your second and third stirrups should be placed slightly to the left and right of the first, respectively. Follow each stirrup with a base and end by covering the remaining portion of the leg showing pre-wrap up to the anterior crease of the ankle with extra base strips known as horseshoes. These help to prevent excess eversion and inversion (going too far on one side or the other).

HOW TO_stirrup1   HOW TO_stirrups HOW TO_horseshoes

5. Figure-8 heel locks are the next step. You may start on either side as they both have to be covered but I usually start medially and work outward. You start your tape at a downward angle on the medial side of the foot’s anchor strip; bring it underneath the heel and around the Achilles’ tendon to finish back where you started. Down, under, around, and back to where you started. Do this twice on each side to prevent the heel from rolling.

HOW TO_heel lock 2 HOW TO _heel lock 1

6. After the figure-8’s are complete, close it off with horseshoes all the way down the leg and another anchor strip on the foot. This secures any loose ends and helps make the taping look neat. There should be neither holes nor wrinkles in the tape job and the person you are taping should be comfortable and able to walk once finished.

HOW TO_finished

I came across a video that looked very helpful. It has some slightly different techniques but nothing too abnormal that you shouldn’t be able to follow it. You’ll also note that the ATC (Certified Athletic Trainer) in this video makes use of heel and lace pads**. These are optional and are used for added protection against friction from the tape.

I couldn’t get it to show on here, my apologies. Click on the link below to watch the video.

http://www.youtube.com/watch?v=evjrBcFuimw

References:

Images: http://www.nismat.org/traincor/ankle_tape.html, http://www.bing.com/images/search?q=four+ligaments+on+medial+foot&qs=n&form=QBIR&pq=four+ligaments+on+medial+foot&sc=0-0&sp=-1&sk=#

Video: http://www.youtube.com/watch?v=evjrBcFuimw

3 Comments »